Gottlieb "Spider-Man" Pinball
Background
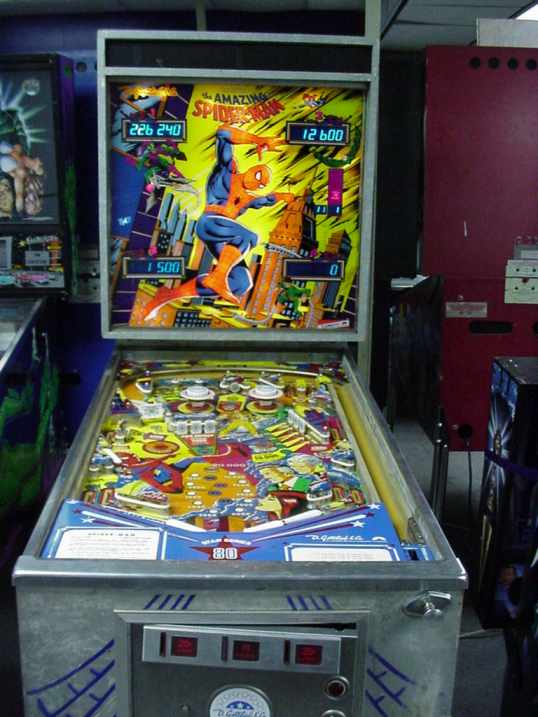
The Amazing Spider-Man Pinball was designed by Ed Krynsky with artwork by Gordon Morison. Manufactured by D. Gottlieb & Co it was their first "Star Series 80" machine. The first machine came out of the factory in May 1980. A total of 7,625 machines were produced, including one which Stan Lee owned and played for many years. The System 80 went on to be the underlying technology for Gottlieb pinball machines for following decade, including for the famed Haunted House and The Black Hole pinballs.
Spider-Man features:
- Special 24" (60cm) wide-bodied cabinet
- 4-Player game
- 6-Digit LED display
- 4 Flippers (No Center Post)
- 1 Lane (with Spinner)
- 4 Exit Lanes
- 2 Slingshot Bumpers
- 3 Kick-Out Holes
- 2 Pop Bumpers
- 2 Spot Targets
- 2 Drop Target Banks (3 and 5 targets)
I have one sitting upstairs in my games/music room, so I feel quite qualified to review it. I have performed most of a full restoration on it by following the detailed System 80 Restoration instructions from PinRepair.Com written by Clay Harrell. I also had some handy email help from Ed Krzycki at Great Plains Electronics. Of course, I also have a copy of the indispensable Amazing Spider-Man Gottlieb Pinball Instruction Manual.
Story Details
A friend of mine purchased my Spider-Man pinball by telephone bid at auction in Australia back in 1997 or so. I was actually flying on a plane at the time of the auction, so I gave him a bid limit of AU$2,000 and that's exactly as high as the bidding went. Add 10% auctioneer's fees, $500 shipping, $300 import duty and the final cost was around AU$3,000. At the time that was probably a bit over US$2,000.
I was working very hard back then and didn't have time to restore the machine. I opened the wooden shipping crate to check it contained a Spider-Man pinball, superficially ogled the glorious artwork, then screwed the lid closed again. The machine lived in that crate for the next ten years and followed me through two house moves. Ten years later (which is to say, a year ago) I was finally settled and had the spare time to take on the task of restoring this classic machine to some of its former glory.
When I re-opened the crate I was in for a bit of a shock. The paint on the body of the machine was rather beaten up, the backglass was cracked and the metalwork was stained and rust-spotted. One the numeric displays didn't light, there was no sound, and in fact the machine would only turn on sporadically. Half the flippers and most of the lights didn't work. Basically it was a mess! Time to get restoring.
The very first thing was to get the power supply working. I treated myself to a new soldering iron and replaced the dozen or more "must-replace" components on the power board, following the System 80 instructions from PinRepair.Com. Nothing expensive (total under NZ$100), and it was good to get my soldering skills back again. I soon had a reliable power supply with a steady and accurate voltage.
The machine still didn't boot reliably, so I moved on to the CPU board. The System 80 machines have a universal problem here with the rechargeable on-board battery. It invariably leaks after ten years, corroding the components beneath it. My board didn't look too corroded, but it didn't work either. There's thirty or more must-replace parts to replace here, but again nothing really expensive - a few bucks here, a few bucks there. Most of the effort is getting all of the bits together. The actual soldering only takes two or three hours.
Great news then - finally the machine booted properly. I haven't bothered replacing the battery, so the high scores reset when the machine is turned off. At last I was getting somewhere, and I moved on to the main driver board which contains all the power transistors which drive the lamps and the solenoids (except the flippers which work directly off the flipper buttons).
My driver board didn't look too bad. But when I turned it over, I saw three charred spots on the back. All three of my 2N3055 power transistors had obviously been locked-on at some stage and had toasted the board beneath them. I wasn't sure how deep the damage went, but it looked pretty bad. All of the System 80 machines use identical driver boards, and in general they're pretty reliable. That means that I was able to pick up a second hand board for US$20 on eBay.
The catch was that the seller wouldn't ship the board direct to New Zealand, so I had a few months wait until I could get my hands on the replacement. No problem, I could spend some time on the cabinet. I pulled off the legs and took them in to be re-dip-chromed. That cost me NZ$80 or so. The insides of the legs don't re-chrome properly, but that isn't a problem - the outside looked great.
I pulled out the backglass and packed it away while I worked on the cabinet. In hindsight, that was a mistake - I should have sprayed the backglass immediately with acrylic spray to prevent any further damage. The heating from the bulbs on the head unit cracks the paint and makes it flake. You should immediately spray it to arrest the damage. Backglass restoration is hard. You have four options if your backglass is damaged - (1) live with it, (2) repaint by hand, (3) repair with translucent transfers, (4) buy a modern reproduction. The last one is expensive, and the middle two are very difficult. I'm currently taking option (1)... for now...
But back to the cabinet. The Spider-Man machine has buildings and a floating Spidey head, plus the SPIDER-MAN logo. They're all spray painted red and blue using factory stencils. I painstakingly traced the outlines onto a roll of tracing paper, then took them in to be photocopied on a big commercial copier. Then I carefully cut out my home-made reproduction stencils with a scalpel. My wife had to come and help here with the curved bits around the Spider-Head.
Then once I was happy with the stencils, I sanded the cabinet body and head down to bare wood. I put bog filler in all the holes and sanded down. Then a coat of primer, two undercoats, and finally four coats of reflective silver paint. I spray painted the speaker grill in matt black. Lots of masking tape for all this, of course. Then the webbing effect went on. Krylon does a white webbing in a spray can. Krylon does great stuff, but it's very hard to find in New Zealand. "Spotlight" used to carry it, but their staff are useless, so I had to drive to several stores and finally bought two cans (one in each of two stores) which was just enough to do the job.
The scary bit is spraying the stencils back on. I couldn't find acrylic spray, so I was putting enamel spray on an acrylic base - meaning that cleanup was impossible. The paper stencils leak at the edges, so we needed to painfully apply fine double-sided tape around the edge of the stencils so that they stuck in place while we sprayed. Even taped in place, there was lots of touch-up by hand. My wife did nearly all the stencil and painting work, and it came out great in the end, after a ton of effort. The stencils curl when you use them once, so we ended up cutting a fresh set for the other side instead of being able to re-use the stencils.
Another couple of hundred bucks had gone into paint and materials, not to mention the driving around. But the cabinet was looking great. Also, I returned from an overseas trip having swung past the U.S. and picked up my new driver board, so it was time to reheat the soldering iron. I was on the home straight now.
The new driver board had some slightly dark spots behind the power transistors, but at least it wasn't charred like the original one. Unfortunately it seems like the new driver board had actually been salvaged for parts, so it was missing several transistors! I reverse-cannibalized it, pulling parts off my old board to fill the gaps on the replacement. With trepidation, I plugged it in... and... half the lights were still broken.
Sighing, I got out my notepad and made a list. Some where simple broken bulbs, or dirty bulb holders - but there were still some that looked like transistor problems. In fact, it looked like some of the transistors I had just replaced were still not working. Tracing back with the logic probe, I discovered that one of the IC chips on my "new second-hand" driver board had been "replaced" at some stage by a mad butcher on drugs. The repair job had been so badly botched that it was frying the replacement transistors. No wonder they had decided to use the board for parts!
I carefully removed the ruined "replacement" chip they had put in, bypassed the damaged circuit track and ruined mounting holes, and replaced it with a new chip. Then I pulled off a second round of replacement transistors from my old board (there weren't many left on it by now) and re-replaced them. At last I was down to a handful of non-working features. A few more transistor replacements, a couple of new bulb holders, a few cleaned connectors, new solenoid sleeves, pull out and clean the target bank assemblies, etc., etc., and finally I had every feature working on the table!
I still had a non-working six-digit display, and they're expensive to find second-hand. Fortunately, there's a trick you can do. Often a "broken" display just means that the heater wires that heat the plasma are oxidized. I connected a 9V battery to the heater wire connections (it normally takes 5V) and super-heated them for a couple of minutes. They glowed orange and burnt off all the rust... and the display worked once more. Excellent!
Then followed another round of general preventative work, adding new earthing wires to all the boards. This is very strongly recommended to keep the System 80 boards reliable. I also still had no sound. The sound board connector had been replaced with a rather messy hack job at some stage. The new connector slipped all over the place, I needed to insert some plastic separators and file down the circuit board a bit to get it to connect snugly in the correct spot. But still no sound!
Ah, the sound fuse is blown! Replace that. And still no sound! Finally I discovered that the spade connectors to the speaker were so sloppy and dirty that they weren't contacting at all. I just soldered the wires directly, and finally I had glorious monophonic sound blaring out of the single speaker. But... no Spider-Man theme tune? Just a choice of three or four beeping, sploshing sort of sounds. What was going on? Surely this was the wrong sound board?
No, as it turns out, the sound on the Spider-Man machine when you play the game isn't actually very interesting. It's just generic noises when you hit targets. However, I have been told that there is an option to have the "Spider-Man, Spider-Man" 60's TV theme tune played in "attract mode". I'll put that on my list of things to try out on a rainy day.
I had one final adjustment to make. There's no "free play" mode on the machine, so you need to either keep some coins handy, or leave the door open and fiddle the coin slot mechanism by hand. Or the "nice" solution is to add another sensor to the "start" button so that it becomes a combined "add coin" and "start" button. I went with the nice solution.
I still have a few things left to fix up. I need some adjustable feet so that I can put a steeper slope on the playfield. The original feet were so grubby I couldn't bear to put them on my carpet. There's also a few minor wrinkles and dips in the mylar on my playfield, I'm not sure what my options are for fixing that. The steeper slope might minimize the effect of that.
I'm also going to replace the old main flipper coils with brand new ones. The old ones work, but they're just getting a bit soft and losing power. Still, the machine is 100% playable and it looks just great!
General Comments
So, how does the machine play? Is it any good?
Well, you've got to set your expectations right. This is old-school here, kids. This is the first machine in the generation. It's single ball, single-level playfield. There's no LEDs, no fancy playfield toys. There's no under-table tracks, no above-table tracks, no drop-holes, no sloped ramps. We're hitting targets, spots and lanes here and that's all.
Personally, I can really appreciate the charm of this machine. The table artwork is glorious. The backglass art is great too - I just need to overlook the cracks in the paint on my glass. The game is still a hell-of-a-fun to play. Yeah, it's very basic, but this is pinball the way it was meant to be played.
Overall Rating 

This is a classic machine, and one of the ultimate Spider-Man collectibles. Add the huge personal satisfaction from finally getting my machine going, and surely we're talking five full webs?
Well, no, not quite. I'm going to dock half a web for the rather uninspired sound. It's the weak point in machine that is otherwise superb. I recommend you turn up the stereo while playing. Something like Spider-Man: Music From And Inspired By should do just fine.
Footnote
With all those repairs, the System 80 hardware is supposed to become very reliable. I've been playing the machine off and on for three days, and it's been running great. I'm expecting this classic machine to last another 28 years.